Here, we will be seeing how to configure a Virtual LAN for the VMs we created from the Part 1.
If you remember from Part 1, we selected the default network conifig NAT when prompted. Here I'll show how to make each VM talk to each other, and i'll be showing it via a new custom Network Adapter, not the pre-configured VMnet8 for NAT. This would help you understand more about VMware Workstation.
Below shows the options we selected while creating a VM. The Network Adapter part shows NAT, which is what we selected when configuring.
To be honest, there isn't much needed here, when you have configured all of your VMs to use NAT (VMnet8), they would readily become part of that VMnet8 LAN/subnet, you should be able to ping each other and it should work fine. But what's the fun in that? Let's create our own VMnet adapter/LAN and we will add our VMs to that new interface and test the connectivity.
Preface:
Below are the VMs I have created from Part 1.
One Windows Server 2003 named server1
Three Windows 2000 Clients named as wozz, wozz2, wozz3
1. Creating a new Virtual Adapter for LAN
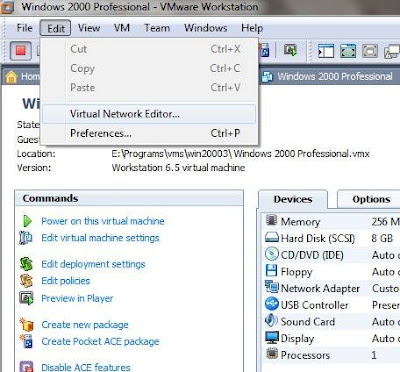
Go to Edit > Virtual Network Editor
Go to Edit > Virtual Network Editor
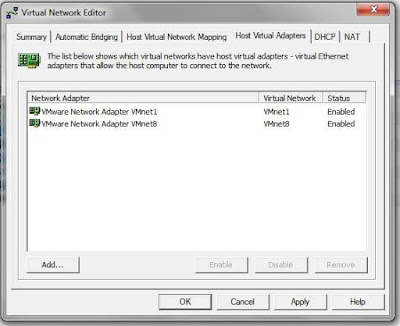
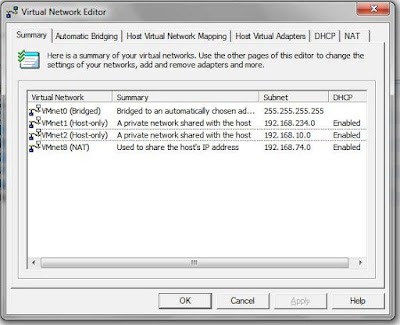
It looks like below
Since VMnet1 and VMnet8 comes preconfigured with VMware, we see them already enabled. So we have 7 free adapters to configure, actually, you can remove VMnet1 and VMnet8 and configure them as per your need. It's just that 1 and 8 are preconfigured for quick deployment and for the users who are not very familiar with the Network Configuration part.
I am choosing the empty VMnet2 as our Network Adapter for our LAN, starting with the configuration, click the > symbol to configure the subnet for our LAN. I've chose 192.168.10.0/24, click OK after entering the subnet details.
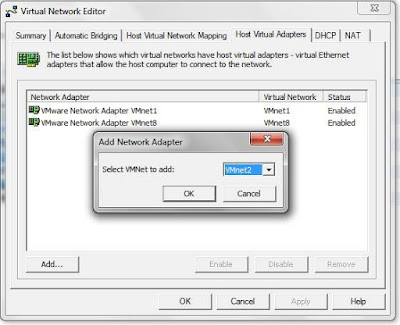
After defining the subnet, we need to add the Adapter to the Virtual Adapters list, to do that, click on the tab Host Virtual Adapter and select the Add... option, select our VMnet2 from the dropdown and click OK.
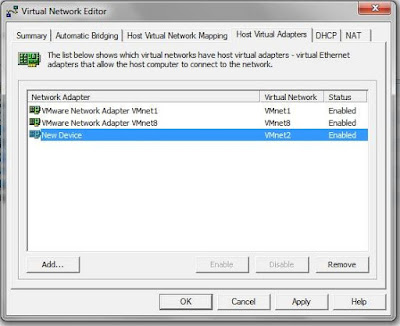
It shows the name as New Device but not as VMnet2, because the Adapter is not fully configured yet.
To fully enable the VMnet2 Adapter, go to the DHCP tab and select the VMnet2 and click the Start button under DHCP service, basically, this would enable the DHCP server for the VMnet2 Adapter, so any host in that LAN configured as DHCP Clients would receive the IP configuration via this service.
Now if we go to the Host Virtual Adapter tab, we will see the correct Adapter name for VMnet2
Summary tab shows all the Virtual Adapters that are enabled and can be used for the VMs.
Note: VMnet2 is showing as (Host-only) like VMnet1, because, we configured the Adapter to be Host-only, if you need to have NAT, then that Adapter has to be configured under the NAT tab. If it needs to be Bridged, it has to be configured under the Automatic Bridging tab. In our case, we made VMnet2 as Host-only, meaning, the VMs that are part of this Adapter are totally isolated from the Host machine.
2. Adding VMs to the new Virtual Adapter.
Now that we have our new Virtual Adapter VMnet2, let's add our VMs to use this Adapter.
Open the respective VM and select the Edit virtual machine settings under Commands
From that window, select the Network Adapter option, it shows the same options which we saw when installing the OS in the Part 1.
Check the Custom: Specific virtual network and select our VMnet2 Adapter from the dropdown.
Do the same on the other VMs, this will make them part of our VMnet2 Adapter under the subnet 192.168.10.0/24, once the VMs are turned ON, they would receive the IP configuration details from the VMnet2 DHCP service, considering that the OS Network Adapter for the VMs are configured to get the IP address details automatically, like below.
3. Final Testing
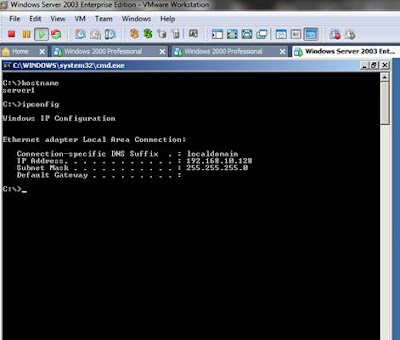
I've started all 4 VMs, once they're UP, checked the IP configuration details.
server1
wozz
wozz2
wozz3
Everything looks good! I was able to ping each other without any problem,
Server1 registered all three Clients as part of its Windows Workgroup.
Server1 registered all three Clients as part of its Windows Workgroup.
This concludes Part 2 and the article, now we have a virtual LAN infrastructure to play with.









No comments:
Post a Comment